


News
Ci-dessous, les différences entre deux révisions de la page.
| Les deux révisions précédentesRévision précédenteProchaine révision | Révision précédente | ||
| en:tutomakeobj3 [2010/07/03 10:16] – gauthier | en:tutomakeobj3 [2024/06/15 00:27] (Version actuelle) – modification externe 127.0.0.1 | ||
|---|---|---|---|
| Ligne 1: | Ligne 1: | ||
| ====== III.Source files ====== | ====== III.Source files ====== | ||
| - | + | < | |
| - | < | + | |
| ===== 1.How does it work ? ===== | ===== 1.How does it work ? ===== | ||
| - | |||
| A Simutrans' | A Simutrans' | ||
| - | + | {{ fr:tuto:dat: | |
| - | {{ | + | |
| for example : | for example : | ||
| - | |||
| <WRAP box> | <WRAP box> | ||
| - | |||
| — | — | ||
| - | |||
| Parameters of the second object</ | Parameters of the second object</ | ||
| - | |||
| Pictures have other constraints depending on the pakset you create for. The picture must be saved as 24 bits .png (Photofiltre save in 24 bits by default), makeobj can only read .png and if it's a 32 bits .png (with a transparency layer) you'll have a graphical glitch. The dimensions of your pictures must be multiples of the pakset' | Pictures have other constraints depending on the pakset you create for. The picture must be saved as 24 bits .png (Photofiltre save in 24 bits by default), makeobj can only read .png and if it's a 32 bits .png (with a transparency layer) you'll have a graphical glitch. The dimensions of your pictures must be multiples of the pakset' | ||
| - | |||
| You have to know how the source pictures work. | You have to know how the source pictures work. | ||
| - | |||
| <WRAP important> | <WRAP important> | ||
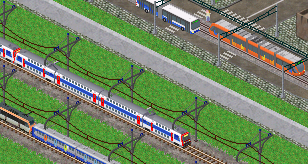
| - | + | The picture is cut in 128%%*%%128 pixels squares (so the picture must have dimensions multiple of 128). This is an example of a source picture part (here is the source picture of the AMT) :{{ fr:tuto:dat: | |
| - | The picture is cut in 128%%*%%128 pixels squares (so the picture must have dimensions multiple of 128). This is an example of a source picture part (here is the source picture of the AMT) : | + | |
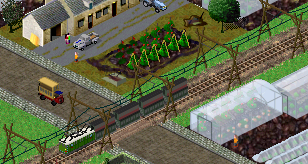
| Then you'll have to define the squares in the .dat file. Coordinates are used, the first for lines and the second for columns. See here in the same picture : | Then you'll have to define the squares in the .dat file. Coordinates are used, the first for lines and the second for columns. See here in the same picture : | ||
| - | + | {{ fr:tuto:dat: | |
| - | {{ | + | |
| The .dat file parameters and the corresponding pictures can be different but can be also very repetitive if you often create the same type of objects, so I will give you graphical shapes and .dat shapes for you to make your files easier, objects will be described one by one. | The .dat file parameters and the corresponding pictures can be different but can be also very repetitive if you often create the same type of objects, so I will give you graphical shapes and .dat shapes for you to make your files easier, objects will be described one by one. | ||
| - | |||
| A picture is defined in a .dat file as this : | A picture is defined in a .dat file as this : | ||
| - | |||
| < | < | ||
| - | |||
| example : imageUp[3]=AMT.3.3 | example : imageUp[3]=AMT.3.3 | ||
| - | |||
| the picture used for imageUp[3] is the square on the intersection of the fourth line and the fourth column of AMT.png.</ | the picture used for imageUp[3] is the square on the intersection of the fourth line and the fourth column of AMT.png.</ | ||
| - | |||
| <WRAP info> | <WRAP info> | ||
| - | |||
| <WRAP info>In .dat files, every parameter is written as here : | <WRAP info>In .dat files, every parameter is written as here : | ||
| - | |||
| <WRAP box> | <WRAP box> | ||
| - | |||
| Every number is integer. The text respects shift.</ | Every number is integer. The text respects shift.</ | ||
| + | |||
| + | <WRAP tip>To make a comment in a .dat file, begin the commented lines with a #</ | ||
| ===== 2.Offset ===== | ===== 2.Offset ===== | ||
| - | |||
| The offset allows you to move the picture in some situations. This technic must be used only in necessary situations, it musn't be used instead of the moving directly the graphics on the picture. | The offset allows you to move the picture in some situations. This technic must be used only in necessary situations, it musn't be used instead of the moving directly the graphics on the picture. | ||
| - | |||
| How to use the offset : | How to use the offset : | ||
| - | |||
| <WRAP box> | <WRAP box> | ||
| - | |||
| x is the number of pixels to the right and y is the number of pixels to the bottom. | x is the number of pixels to the right and y is the number of pixels to the bottom. | ||
| - | |||
| In the example below, the picture is moved of 16 pixels to the top. | In the example below, the picture is moved of 16 pixels to the top. | ||
| - | |||
| <WRAP box> | <WRAP box> | ||
| - | ===== 3.Utiliser votre éditeur de texte ===== | + | <WRAP important> |
| + | ===== 3.Angle of slopes ===== | ||
| - | ==== 1.Windows ==== | + | Since Simutrans 120, slopes can be of two different heights. Some paksets use full and half slopes, some other paksets use full and double slopes. |
| + | Pak128 use half slopes. In this pakset, most ways cannot be built on hard slopes, such as tracks and highways. | ||
| - | Under windows, notepad is used and NOT another text editor. It's accessible in the start menu%%\%%programs%%\%%accessories%%\%%notepad. The useful tools of notepad | + | <WRAP info>In pak128, soft slopes are 16 pixels high and hard slopes |
| + | ===== 4.Icons (buttons) ===== | ||
| - | <WRAP tip> | + | Objects which need icons have something like that on their graphical pattern: |
| + | {{ fr: | ||
| - | Be careful using the tool " | + | Images of icons must contain only the 16 by 16 pixels square at top left of this image, everything else must be removed, otherwise there would be display errors in game. |
| + | The elements around the icon itself are specific to pak128, they are used in its icons. | ||
| - | Finally, to save a source file for Simutrans, replace the default extension " | + | ===== 5.Cursors ===== |
| - | ==== 2.Linux ==== | + | On graphical patterns of objects needing a cursor, the tile used to place the cursor is higher than the bottom of the square which it is placed in. This is intended to compensate an offset downward applied by the game. |
| + | ===== 6.Examples of source files ===== | ||
| - | Linux has many text editors. They often depend on the release, or on the installed desktop manager. The best thing to do is to see the documentation given with your text editor to know its keyboard shortcuts. | + | You will find example of source files for all kinds of objects in each pakset' |
| + | [[http:// | ||
| - | <WRAP tip>Some examples : Gedit, Kate, Leafpad…</ | + | ===== 7.Using your notepad ===== |
| + | ==== 1.Windows ==== | ||
| - | <WRAP warning> | + | Under windows, simple |
| + | <WRAP tip> | ||
| - | To save a source file for Simutrans, | + | Be careful using the tool “replace” if you use the icon “replace all”, it can modify some text parts which aren't supposed |
| + | Finally, to save a source file for Simutrans, replace the default extension ”.txt” by the extension ”.dat”. | ||
| - | <WRAP tip>Be careful, if you work on linux and windows, the wrap symbols aren't the same on the two OS. A file created on the one can be strangely displayed on the other one. You'd rather work on only one OS if you don't know the conversion commands.</ | + | ==== 2.Linux ==== |
| - | ===== 4.Objets ===== | + | Linux has many text editors. They often depend on the release, or on the installed desktop manager. The best thing to do is to see the documentation given with your text editor to know its keyboard shortcuts. |
| + | <WRAP tip>Some examples : Gedit, Kate, Leafpad…</ | ||
| - | [[http:// | + | <WRAP warning> |
| + | To save a source file for Simutrans, the process is the same as windows, you just have to use the extension " | ||
| - | [[http:// | + | <WRAP tip>Be careful, if you work on linux and windows, the wrap symbols aren't the same on the two OS. A file created on the one can be strangely displayed on the other one. You'd rather work on only one OS if you don't know the conversion commands.</WRAP> |
| - | + | ||
| - | + | ||
| - | [[http:// | + | |
| - | + | ||
| - | + | ||
| - | [[http:// | + | |
| - | + | ||
| - | + | ||
| - | [[http:// | + | |
| - | + | ||
| - | + | ||
| - | [[http:// | + | |
| - | + | ||
| - | + | ||
| - | [[http:// | + | |
| - | + | ||
| - | + | ||
| - | [[http:// | + | |
| - | + | ||
| - | + | ||
| - | [[http:// | + | |
| - | + | ||
| - | + | ||
| - | [[http:// | + | |
| - | + | ||
| - | + | ||
| - | [[http:// | + | |
| - | + | ||
| - | + | ||
| - | [[http:// | + | |
| - | + | ||
| - | + | ||
| - | [[http:// | + | |
| - | [[http:// | + | ===== 8.Objects ===== |
| + | [[en: | ||
| - | [[http:// | + | [[en:tutocitycar|citycars]] |
| + | [[en: | ||
| - | [[http:// | + | [[en:tutoway|ways]] |
| + | [[en: | ||
| - | [[http:// | + | [[en:tutobridge|bridges]] |
| + | [[en: | ||
| - | ===== 5.Pages annexes ===== | + | [[en: |
| + | [[en: | ||
| - | graphismes des bâtiments : [[:fr: | + | [[en:tutostationextension|station extensions]] |
| + | [[en: | ||
| - | waytype : [[:fr: | + | [[en:tutobuilding|citybuildings, |
| + | [[en: | ||
| - | engine_type : [[:fr: | + | [[en:tutogood|goods]] |
| + | [[en: | ||
| - | freight / goods : [[:fr: | + | [[en:tutotree|trees]] |
| + | [[en: | ||
| - | smoke : [[: | + | ===== 9.Related pages ===== |
| + | graphics of buildings : [[en: | ||
| - | sound : [[:fr: | + | waytype |
| + | engine_type : [[en: | ||
| - | system_type | + | freight / goods : [[en:tutogoods|Goods of pak128]] |
| + | smoke : [[en: | ||
| - | climates | + | sound : [[en:tutosound|Souds of pak128]] |
| + | system_type : [[en: | ||
| - | <WRAP box>tuto suivant | + | climates |
| + | <WRAP box>next tutorial : [[en: | ||