


Cette page vous donne les différences entre la révision choisie et la version actuelle de la page.
|
en:tutovehicle [2014/11/28 17:50] gauthier |
en:tutovehicle [2015/02/18 05:55] (version actuelle) |
||
|---|---|---|---|
| Ligne 1: | Ligne 1: | ||
| - | <WRAP box>[[http://www.simutrans-france.fr.nf/doku.php?id=en:tutomakeobj3#objects|Come back to objects]] </WRAP> | + | <WRAP box>[[en:tutomakeobj3#objects|Come back to objects]] </WRAP> |
| ====== Vehicles ====== | ====== Vehicles ====== | ||
| - | |||
| ===== Essential parameters ===== | ===== Essential parameters ===== | ||
| - | |||
| This is the parameters for a vehicle : | This is the parameters for a vehicle : | ||
| - | |||
| |**Parameter \\ ** |**Description** |**Content \\ ** |**Example \\ ** | | |**Parameter \\ ** |**Description** |**Content \\ ** |**Example \\ ** | | ||
| |obj |object type |vehicle || | |obj |object type |vehicle || | ||
| |name |name |text |SNFOS_Aero_front | | |name |name |text |SNFOS_Aero_front | | ||
| - | |waytype |way type |internal name |maglev_track | | + | |[[en:tutowaytype|waytype]] |way type |internal name |maglev_track | |
| |cost |price (%%*%%100c) |number |5000000 | | |cost |price (%%*%%100c) |number |5000000 | | ||
| |weight |weight (t) |number |35 | | |weight |weight (t) |number |35 | | ||
| |runningcost |running cost (0,01c/km) |number |90 | | |runningcost |running cost (0,01c/km) |number |90 | | ||
| - | |engine_type |energy used |internal name |fuel_cell | | + | |[[en:tutoenginetype|engine_type]] |energy used |internal name |fuel_cell | |
| |speed |max speed (km/h) |number |550 | | |speed |max speed (km/h) |number |550 | | ||
| - | |freight |freight content |internal name |Passagiere | | + | |[[en:tutogoods|freight]] |freight content |internal name |Passagiere | |
| |payload |quantity of content |number |65 | | |payload |quantity of content |number |65 | | ||
| |power |power (kw) |number |4200 | | |power |power (kw) |number |4200 | | ||
| - | |gear |gear (%%*%%0,01) |number |100 | | + | |[[en:tutovehicle#gear|gear]] |gear (%%*%%0,01) |number |100 | |
| |intro_year |introduction year |number |2019 | | |intro_year |introduction year |number |2019 | | ||
| |intro_month |introduction month |number |11 | | |intro_month |introduction month |number |11 | | ||
| |retire_year |retire year |number |2039 | | |retire_year |retire year |number |2039 | | ||
| |retire_month |retire month |number |11 | | |retire_month |retire month |number |11 | | ||
| - | |smoke |smoke |internal name |steam | | + | |[[en:tutosmoke|smoke]] |smoke |internal name |steam | |
| - | |sound |sound at starting |see below |0 | | + | |[[en:tutosound|sound]] |sound at starting |see below |0 | |
| |length |length of the vehicle |number |8 | | |length |length of the vehicle |number |8 | | ||
| |copyright |name of the creator |text |Gauthier | | |copyright |name of the creator |text |Gauthier | | ||
| - | |Constraint |see below |||| | + | |[[en:tutovehicle#Constraint|Constraint]] |see below |||| |
| ===== Png and dat pattern ===== | ===== Png and dat pattern ===== | ||
| - | |||
| A vehicle's picture needs eight pictures : one for each direction of the vehicle (North, North-East, East, South-East, South, etc ...). Symmetrical vehicles would have same pictures twice (same North and South for example). Vehicles can have different length : each length unit is four pixels in Noth, South, East and West pictures. For diagonal pictures it's a decimal number so the two extremities of the pattern chosen for a defined length will be on each other. This is the graphical pattern :\\ | A vehicle's picture needs eight pictures : one for each direction of the vehicle (North, North-East, East, South-East, South, etc ...). Symmetrical vehicles would have same pictures twice (same North and South for example). Vehicles can have different length : each length unit is four pixels in Noth, South, East and West pictures. For diagonal pictures it's a decimal number so the two extremities of the pattern chosen for a defined length will be on each other. This is the graphical pattern :\\ | ||
| - | |||
| {{ fr:tuto:dat:tramevehicle.png }}The default length is 8 (32 pixels in straight views) if you don't define it in the .dat file. On this pattern, each length is made of a different grey, to use this pattern, take the necessary line according to the way type, delete, thanks to replace color tool and playing on the tolerance, the greys until the right length of the vehicle. The pink unit is the default length (8). The light grey is the front of the vehicle. The background of this picture is the trensparency color for Simutrans. For suspended monorails, the pattern doesn't show the base of the vehicle but its roof. | {{ fr:tuto:dat:tramevehicle.png }}The default length is 8 (32 pixels in straight views) if you don't define it in the .dat file. On this pattern, each length is made of a different grey, to use this pattern, take the necessary line according to the way type, delete, thanks to replace color tool and playing on the tolerance, the greys until the right length of the vehicle. The pink unit is the default length (8). The light grey is the front of the vehicle. The background of this picture is the trensparency color for Simutrans. For suspended monorails, the pattern doesn't show the base of the vehicle but its roof. | ||
| - | |||
| This is the .dat pattern according to the graphical pattern above. | This is the .dat pattern according to the graphical pattern above. | ||
| - | |||
| <WRAP box>obj=vehicle | <WRAP box>obj=vehicle | ||
| Ligne 76: | Ligne 68: | ||
| \\ emptyimage[W]=source.0.6 | \\ emptyimage[W]=source.0.6 | ||
| \\ emptyimage[NW]=source.0.7</WRAP> | \\ emptyimage[NW]=source.0.7</WRAP> | ||
| - | |||
| - | |||
| - | ==== waytype ==== | ||
| - | |||
| - | |||
| - | [[http://www.simutrans-france.fr.nf/doku.php?id=en:tutowaytype|Possible waytypes]] | ||
| - | |||
| - | |||
| - | ==== engine_type ==== | ||
| - | |||
| - | |||
| - | [[http://www.simutrans-france.fr.nf/doku.php?id=en:tutoenginetype|Energies of vehicles]] | ||
| - | |||
| - | |||
| - | ==== freight ==== | ||
| - | |||
| - | |||
| - | [[http://www.simutrans-france.fr.nf/doku.php?id=en:tutogoods|Goods of pak128]] | ||
| - | |||
| ==== gear ==== | ==== gear ==== | ||
| Ligne 109: | Ligne 82: | ||
| Example: a 800 kW powered vehicle is reproduced in game but this power does not fit, the vehicle is underpowered. Then a gear over 100 (1) is added, for instance 130 (1,30). | Example: a 800 kW powered vehicle is reproduced in game but this power does not fit, the vehicle is underpowered. Then a gear over 100 (1) is added, for instance 130 (1,30). | ||
| - | |||
| - | ==== smoke ==== | ||
| - | |||
| - | |||
| - | [[http://www.simutrans-france.fr.nf/doku.php?id=en:tutosmoke|Smokes of pak128]] | ||
| - | |||
| - | ==== sound ==== | ||
| - | |||
| - | |||
| - | [[http://www.simutrans-france.fr.nf/doku.php?id=en:tutosound|Sounds of pak128]] | ||
| - | |||
| ==== Constraint ==== | ==== Constraint ==== | ||
| - | |||
| This parameter defines which vehicle can be placed before and which vehicle can be placed after a vehicle. If it's not defined, the vehicle can be placed before or after any vehicle witheout constraints. | This parameter defines which vehicle can be placed before and which vehicle can be placed after a vehicle. If it's not defined, the vehicle can be placed before or after any vehicle witheout constraints. | ||
| - | |||
| There's one possible vehicle per line, a constraint line is written as this (example) : | There's one possible vehicle per line, a constraint line is written as this (example) : | ||
| - | |||
| <WRAP box>Constraint[Prev][0]=none</WRAP> | <WRAP box>Constraint[Prev][0]=none</WRAP> | ||
| - | |||
| Prev : vehicle can be placed before | Prev : vehicle can be placed before | ||
| - | |||
| Next : vehicle can be placed after | Next : vehicle can be placed after | ||
| - | |||
| 0,1,2,3,… : it's necessary to order constraints Prev and Next by giving them a number, example : | 0,1,2,3,… : it's necessary to order constraints Prev and Next by giving them a number, example : | ||
| - | |||
| <WRAP box>Constraint[Prev][0]=vehicle1 | <WRAP box>Constraint[Prev][0]=vehicle1 | ||
| - | + | \\ Constraint[Prev][1]=vehicle2 | |
| - | + | \\ Constraint[Prev][2]=vehicle3 | |
| - | Constraint[Prev][1]=vehicle2 | + | \\ Constraint[Next][0]=vehicle4</WRAP> |
| - | + | ||
| - | + | ||
| - | Constraint[Prev][2]=vehicle3 | + | |
| - | + | ||
| - | + | ||
| - | Constraint[Next][0]=vehicle4</WRAP> | + | |
| The content can be the name of a vehicle (the name of the paramter "name" of the chosen vehicle) or "none" so nothing can be put before or after the vehicle. | The content can be the name of a vehicle (the name of the paramter "name" of the chosen vehicle) or "none" so nothing can be put before or after the vehicle. | ||
| <WRAP important>"none" must be written at last of Prev or Next constraints. Makeobj stops reading constraints when it reaches "none" so if there are other constraints written after, they won't be taken into account. If a vehicle has no "none" in its Prev (or Next) constraints, then players will have to place a vehicle before (or after) this one.</WRAP> | <WRAP important>"none" must be written at last of Prev or Next constraints. Makeobj stops reading constraints when it reaches "none" so if there are other constraints written after, they won't be taken into account. If a vehicle has no "none" in its Prev (or Next) constraints, then players will have to place a vehicle before (or after) this one.</WRAP> | ||
| - | |||
| For a vehicle to be put after another, the first vehicle must be in Constraint[Prev] of the second one which must be in the constraint[Next] of the first one. | For a vehicle to be put after another, the first vehicle must be in Constraint[Prev] of the second one which must be in the constraint[Next] of the first one. | ||
| - | |||
| Example of constraint (SNCF_z22500_ZRBx_front) | Example of constraint (SNCF_z22500_ZRBx_front) | ||
| - | |||
| <WRAP box>Constraint[Prev][0]=SNCF_z22500_ZRBx_rear\\ Constraint[Prev][1]=none\\ Constraint[Next][0]=SNCF_z22500_ZBx_ZAB</WRAP> | <WRAP box>Constraint[Prev][0]=SNCF_z22500_ZRBx_rear\\ Constraint[Prev][1]=none\\ Constraint[Next][0]=SNCF_z22500_ZBx_ZAB</WRAP> | ||
| - | |||
| ===== Vehicle with freight images ===== | ===== Vehicle with freight images ===== | ||
| - | |||
| Some vehicles, almost freight ones, have a different picture when they are empty or loaded. This is the necessary parameters, for example with two different freight images for two different goods : | Some vehicles, almost freight ones, have a different picture when they are empty or loaded. This is the necessary parameters, for example with two different freight images for two different goods : | ||
| - | |||
| <WRAP box>freightimagetype[0]=good1\\ freightimagetype[1]=good2 | <WRAP box>freightimagetype[0]=good1\\ freightimagetype[1]=good2 | ||
| - | |||
| \\ freightimage[0][S]=image.x.2\\ freightimage[0][E]=image.x.0\\ freightimage[0][SE]=image.x.1\\ freightimage[0][SW]=image.x.3\\ freightimage[0][N]=image.x.4\\ freightimage[0][W]=image.x.6\\ freightimage[0][NW]=image.x.5\\ freightimage[0][NE]=image.x.7 | \\ freightimage[0][S]=image.x.2\\ freightimage[0][E]=image.x.0\\ freightimage[0][SE]=image.x.1\\ freightimage[0][SW]=image.x.3\\ freightimage[0][N]=image.x.4\\ freightimage[0][W]=image.x.6\\ freightimage[0][NW]=image.x.5\\ freightimage[0][NE]=image.x.7 | ||
| - | |||
| \\ freightimage[1][S]=image.x².2\\ freightimage[1][E]=image.x².0\\ freightimage[1][SE]=image.x².1\\ freightimage[1][SW]=image.x².3\\ freightimage[1][N]=image.x².4\\ freightimage[1][W]=image.x².6\\ freightimage[1][NW]=image.x².5\\ freightimage[1][NE]=image.x².7</WRAP> | \\ freightimage[1][S]=image.x².2\\ freightimage[1][E]=image.x².0\\ freightimage[1][SE]=image.x².1\\ freightimage[1][SW]=image.x².3\\ freightimage[1][N]=image.x².4\\ freightimage[1][W]=image.x².6\\ freightimage[1][NW]=image.x².5\\ freightimage[1][NE]=image.x².7</WRAP> | ||
| - | |||
| First goods are defined using their internal names. The used number is put in brackets. Then the graphical pattern of the base picture of a vehicle can be used here if you use freightimage[n°] instead of EmptyImage. In the example below, freightimage[0] are for the vehicle loaded with good1 and freightimage[1] is for the vehicle loaded with good2. x and x² are the number of the lines of these pictures. | First goods are defined using their internal names. The used number is put in brackets. Then the graphical pattern of the base picture of a vehicle can be used here if you use freightimage[n°] instead of EmptyImage. In the example below, freightimage[0] are for the vehicle loaded with good1 and freightimage[1] is for the vehicle loaded with good2. x and x² are the number of the lines of these pictures. | ||
| - | |||
| Example with bullk wagons of Cirrus : | Example with bullk wagons of Cirrus : | ||
| - | |||
| <WRAP box>EmptyImage[S]=cirrus.8.2\\ EmptyImage[E]=cirrus.8.0\\ EmptyImage[SE]=cirrus.8.1\\ EmptyImage[SW]=cirrus.8.3\\ EmptyImage[N]=cirrus.8.4\\ EmptyImage[W]=cirrus.8.6\\ EmptyImage[NW]=cirrus.8.5\\ EmptyImage[NE]=cirrus.8.7\\ freightimagetype[0]=Kohle\\ freightimagetype[1]=Eisenerz\\ freightimagetype[2]=Stone\\ freightimagetype[3]=Sand\\ freightimagetype[4]=fertilizer\\ freightimagetype[5]=waste\\ freightimage[0][S]=cirrus.11.2\\ freightimage[0][E]=cirrus.11.0\\ freightimage[0][SE]=cirrus.11.1\\ freightimage[0][SW]=cirrus.11.3\\ freightimage[0][N]=cirrus.11.4\\ freightimage[0][W]=cirrus.11.6\\ freightimage[0][NW]=cirrus.11.5\\ freightimage[0][NE]=cirrus.11.7\\ freightimage[1][S]=cirrus.9.2\\ freightimage[1][E]=cirrus.9.0\\ freightimage[1][SE]=cirrus.9.1\\ freightimage[1][SW]=cirrus.9.3\\ freightimage[1][N]=cirrus.9.4\\ freightimage[1][W]=cirrus.9.6\\ freightimage[1][NW]=cirrus.9.5\\ freightimage[1][NE]=cirrus.9.7\\ freightimage[2][S]=cirrus.12.2\\ freightimage[2][E]=cirrus.12.0\\ freightimage[2][SE]=cirrus.12.1\\ freightimage[2][SW]=cirrus.12.3\\ freightimage[2][N]=cirrus.12.4\\ freightimage[2][W]=cirrus.12.6\\ freightimage[2][NW]=cirrus.12.5\\ freightimage[2][NE]=cirrus.12.7\\ freightimage[3][S]=cirrus.10.2\\ freightimage[3][E]=cirrus.10.0\\ freightimage[3][SE]=cirrus.10.1\\ freightimage[3][SW]=cirrus.10.3\\ freightimage[3][N]=cirrus.10.4\\ freightimage[3][W]=cirrus.10.6\\ freightimage[3][NW]=cirrus.10.5\\ freightimage[3][NE]=cirrus.10.7\\ freightimage[4][S]=cirrus.10.2\\ freightimage[4][E]=cirrus.10.0\\ freightimage[4][SE]=cirrus.10.1\\ freightimage[4][SW]=cirrus.10.3\\ freightimage[4][N]=cirrus.10.4\\ freightimage[4][W]=cirrus.10.6\\ freightimage[4][NW]=cirrus.10.5\\ freightimage[4][NE]=cirrus.10.7\\ freightimage[5][S]=cirrus.11.2\\ freightimage[5][E]=cirrus.11.0\\ freightimage[5][SE]=cirrus.11.1\\ freightimage[5][SW]=cirrus.11.3\\ freightimage[5][N]=cirrus.11.4\\ freightimage[5][W]=cirrus.11.6\\ freightimage[5][NW]=cirrus.11.5\\ freightimage[5][NE]=cirrus.11.7</WRAP> | <WRAP box>EmptyImage[S]=cirrus.8.2\\ EmptyImage[E]=cirrus.8.0\\ EmptyImage[SE]=cirrus.8.1\\ EmptyImage[SW]=cirrus.8.3\\ EmptyImage[N]=cirrus.8.4\\ EmptyImage[W]=cirrus.8.6\\ EmptyImage[NW]=cirrus.8.5\\ EmptyImage[NE]=cirrus.8.7\\ freightimagetype[0]=Kohle\\ freightimagetype[1]=Eisenerz\\ freightimagetype[2]=Stone\\ freightimagetype[3]=Sand\\ freightimagetype[4]=fertilizer\\ freightimagetype[5]=waste\\ freightimage[0][S]=cirrus.11.2\\ freightimage[0][E]=cirrus.11.0\\ freightimage[0][SE]=cirrus.11.1\\ freightimage[0][SW]=cirrus.11.3\\ freightimage[0][N]=cirrus.11.4\\ freightimage[0][W]=cirrus.11.6\\ freightimage[0][NW]=cirrus.11.5\\ freightimage[0][NE]=cirrus.11.7\\ freightimage[1][S]=cirrus.9.2\\ freightimage[1][E]=cirrus.9.0\\ freightimage[1][SE]=cirrus.9.1\\ freightimage[1][SW]=cirrus.9.3\\ freightimage[1][N]=cirrus.9.4\\ freightimage[1][W]=cirrus.9.6\\ freightimage[1][NW]=cirrus.9.5\\ freightimage[1][NE]=cirrus.9.7\\ freightimage[2][S]=cirrus.12.2\\ freightimage[2][E]=cirrus.12.0\\ freightimage[2][SE]=cirrus.12.1\\ freightimage[2][SW]=cirrus.12.3\\ freightimage[2][N]=cirrus.12.4\\ freightimage[2][W]=cirrus.12.6\\ freightimage[2][NW]=cirrus.12.5\\ freightimage[2][NE]=cirrus.12.7\\ freightimage[3][S]=cirrus.10.2\\ freightimage[3][E]=cirrus.10.0\\ freightimage[3][SE]=cirrus.10.1\\ freightimage[3][SW]=cirrus.10.3\\ freightimage[3][N]=cirrus.10.4\\ freightimage[3][W]=cirrus.10.6\\ freightimage[3][NW]=cirrus.10.5\\ freightimage[3][NE]=cirrus.10.7\\ freightimage[4][S]=cirrus.10.2\\ freightimage[4][E]=cirrus.10.0\\ freightimage[4][SE]=cirrus.10.1\\ freightimage[4][SW]=cirrus.10.3\\ freightimage[4][N]=cirrus.10.4\\ freightimage[4][W]=cirrus.10.6\\ freightimage[4][NW]=cirrus.10.5\\ freightimage[4][NE]=cirrus.10.7\\ freightimage[5][S]=cirrus.11.2\\ freightimage[5][E]=cirrus.11.0\\ freightimage[5][SE]=cirrus.11.1\\ freightimage[5][SW]=cirrus.11.3\\ freightimage[5][N]=cirrus.11.4\\ freightimage[5][W]=cirrus.11.6\\ freightimage[5][NW]=cirrus.11.5\\ freightimage[5][NE]=cirrus.11.7</WRAP> | ||
| Ligne 193: | Ligne 130: | ||
| ===== Step by step vehicle ===== | ===== Step by step vehicle ===== | ||
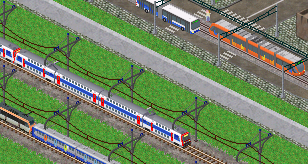
| + | As a practical example, we are going to remake the electric multiple unit Etat 1001. Here is an extract of its source picture:{{ fr:tuto:dat:vehicule01.png }}We have to use the graphical pattern given above. As Etat 1001 is a train, the right line to use is "track/tram". Select it precisely on the pattern and make a new picture with it, name it "Etat1001.png". Here is this picture:{{ fr:tuto:dat:vehicule02.png }}Remove the red lines at top and bottom and remove the text "track/tram". Then, since length of Etat 1001 is 10, remove the units in excess to get only 10 length units. The pattern is made of grey shades so it is easy to remove units in excess with the color replacing tool of photofiltre. | ||
| - | To have a concrete example we are going to make the front of the AGV (old version) :{{ fr:tuto:dat:vehicule01.png }}We are going to use the graphical pattern as above, since the AGV is a train, use the line "track/MLM". Take it with precision on the pattern and paste it in a new picture "AGV.png". This is this picture :{{ fr:tuto:dat:vehicule02.png }}Supprimez le cadre rouge et le texte “track/MLM”. Ensuite sachant que l'avant d'AGV a une longueur de 11, supprimons les longueurs en trop pour n'avoir que 11 longueurs. Etant donné que la trame est faite à partir de niveaux de gris, on peut utiliser l'outil de remplacement de couleur de photofiltre. | + | <WRAP help>[[en:tutophotofiltre#replace_color|Replace a color in photofiltre]] </WRAP> |
| + | {{ fr:tuto:dat:vehicule03.png }}Removing units in excess is done easily by adjusting tolerance.{{ fr:tuto:dat:vehicule04.png }} | ||
| - | Remove the red shape and the text "track/tram". Then, since the AGV front is 11 length, remove the length units in excess to have only 11 units. Since the pattern is made of greys, we can use the replace color tool of photofiltre. | + | To make it more convenient, it is advised to replace remaining pattern with a simple color (which will also be easy to remove once the vehicle is placed). The magic wand is used with tolerance 0, on the background. Then, invert selection to get only the pattern, and hit delete after having selected red as secondary color. You must also have selection smoothing set to none. |
| + | <WRAP help>[[en:tutophotofiltre#the_magic_wand_tool|Photofiltre tools (magic wand)]] | ||
| - | <WRAP help>[[http://www.simutrans-france.fr.nf/doku.php?id=en:tutophotofiltre#replace_color|Replace a color with photofiltre]] </WRAP> | + | [[en:tutophotofiltre#selection_antialisasing|Selection smoothing (antialiasing) in photofiltre.]] </WRAP> |
| + | So we get a usable pattern for a 10-length train:{{ fr:tuto:dat:vehicule05.png }}All we have to do is placing out images on the pattern like this: | ||
| - | {{ fr:tuto:dat:vehicule03.png }}It's easy to remove the units in excess playing on the tolerance.{{ fr:tuto:dat:vehicule04.png }} | + | {{ fr:tuto:dat:vehicule06.png }}<WRAP important>Obviously, I used transparency so you can see exactly where to place the images, but don't use it when placing yours.</WRAP> |
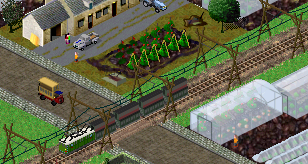
| + | Then, we have to delete pattern pieces in excess with the color replacing tool:{{ fr:tuto:dat:vehicule07.png }}<WRAP info>In this case, the image has only one line because this example has only one vehicle. However, many trains are composed of several vehicles. One can put as much lines as needed in an image provided his computer can handle it. For instance, z50000's source picture has eight lines.</WRAP> | ||
| - | Then to change the rest of the pattern in a united and visible color (to easily remove it once the vehicle is placed), use the magic wand tool with a tolerance of 0 on the background, invert the selection to have only the pattern, use red as second color, switch the selection antialiasing on none, and delete. | + | Let's finish up with the .dat file of this train ! First, make the graphical part of the .dat after the pattern seen above. Replace the right parts, knowing that our image is named Etat1001.png and that the line with the vehicle is the line number 0 (the first one): |
| + | <WRAP box>emptyimage[N]=Etat1001.0.0 | ||
| + | \\ emptyimage[NE]=Etat1001.0.1 | ||
| + | \\ emptyimage[E]=Etat1001.0.2 | ||
| + | \\ emptyimage[SE]=Etat1001.0.3 | ||
| + | \\ emptyimage[S]=Etat1001.0.4 | ||
| + | \\ emptyimage[SW]=Etat1001.0.5 | ||
| + | \\ emptyimage[W]=Etat1001.0.6 | ||
| + | \\ emptyimage[NW]=Etat1001.0.7</WRAP> | ||
| - | <WRAP help>[[http://www.simutrans-france.fr.nf/doku.php?id=en:tutophotofiltre#tools|Tools in photofiltre (and magic wand one)]] | + | Then, add data of Etat 1001. About constraints: it is a EMU, so player can place either another Etat 1001 or nothing, both before and after it. |
| + | <WRAP box>obj=vehicle | ||
| + | \\ name=Etat_1001 | ||
| + | \\ waytype=track | ||
| + | \\ cost=15072000 | ||
| + | \\ runningcost=389 | ||
| + | \\ engine_type=electric | ||
| + | \\ speed=70 | ||
| + | \\ freight=Passagiere | ||
| + | \\ payload=116 | ||
| + | \\ power=346 | ||
| + | \\ gear=100 | ||
| + | \\ | ||
| + | \\ intro_year=1913 | ||
| + | \\ intro_month=5 | ||
| + | \\ retire_year=1938 | ||
| + | \\ retire_month=12 | ||
| + | \\ length=10 | ||
| + | \\ | ||
| + | \\ Constraint[Prev][0]=Etat_1001 | ||
| + | \\ Constraint[Prev][1]=none | ||
| + | \\ Constraint[Next][0]=Etat_1001 | ||
| + | \\ Constraint[Next][1]=none | ||
| + | \\ | ||
| + | \\ emptyimage[N]=Etat1001.0.0 | ||
| + | \\ emptyimage[NE]=Etat1001.0.1 | ||
| + | \\ emptyimage[E]=Etat1001.0.2 | ||
| + | \\ emptyimage[SE]=Etat1001.0.3 | ||
| + | \\ emptyimage[S]=Etat1001.0.4 | ||
| + | \\ emptyimage[SW]=Etat1001.0.5 | ||
| + | \\ emptyimage[W]=Etat1001.0.6 | ||
| + | \\ emptyimage[NW]=Etat1001.0.7</WRAP> | ||
| - | [[http://www.simutrans-france.fr.nf/doku.php?id=en:tutophotofiltre#selection_antialisasing|Antialiasing of selections in photofiltre]] </WRAP> | + | <WRAP tip>To make the propelled vehicle of a trainset (like TGV) in the passengers tab of depots, add freight=passagiere in the dat. |
| - | + | ||
| - | + | ||
| - | So we have a usable pattern for a track vehicle with a length of 11 :{{ fr:tuto:dat:vehicule05.png }}There's just left to place our AGV pictures as here : | + | |
| - | + | ||
| - | + | ||
| - | {{ fr:tuto:dat:vehicule06.png }}<WRAP important>Of course here I used transparency for you to see where the vehicle must be placed but don't use it to place your pictures.</WRAP> | + | |
| - | + | ||
| - | + | ||
| - | Then, parts of the pattern in excess are removed with the replace color tool and this is the source picture :{{ fr:tuto:dat:vehicule07.png }}<WRAP info>Here we have a picture with only one line because the exercise concern only one vehicle, but the source picture of the AGV has five lines. You can use as much lines as you need if you computer can manage them all. For example, the cirrus'picture has 53 lines.</WRAP> | + | |
| - | + | ||
| - | + | ||
| - | Now let's make the .dat file of this AGV front ! Start by making the graphical part of the .dat file with the pattern seen above : | + | |
| - | + | ||
| - | + | ||
| - | <WRAP box>EmptyImage[S]=name.x.2\\ EmptyImage[E]=name.x.0\\ EmptyImage[SE]=name.x.1\\ EmptyImage[NE]=name.x.3\\ EmptyImage[N]=name.x.4\\ EmptyImage[W]=name.x.6\\ EmptyImage[NW]=name.x.5\\ EmptyImage[SW]=name.x.7</WRAP> | + | |
| - | + | ||
| - | + | ||
| - | Replace names and lines, our picture is named AGV.png and the only line is line n° 0 (the first line) : | + | |
| - | + | ||
| - | + | ||
| - | <WRAP box>EmptyImage[S]=AGV.0.2\\ EmptyImage[E]=AGV.0.0\\ EmptyImage[SE]=AGV.0.1\\ EmptyImage[NE]=AGV.0.3\\ EmptyImage[N]=AGV.0.4\\ EmptyImage[W]=AGV.0.6\\ EmptyImage[NW]=AGV.0.5\\ EmptyImage[SW]=AGV.0.7</WRAP> | + | |
| - | + | ||
| - | + | ||
| - | Then you just have to add AGV's datas. For constraints, the AGV front can be placed after nothing (for a convoy's front), after an AGV rear (for multiple units train), before a front pantograph can. This is the result : | + | |
| - | + | ||
| - | + | ||
| - | <WRAP box>obj=vehicle\\ name=Alstom_AGV_front\\ waytype=track\\ length=11\\ payload=40\\ speed=360\\ power=1520\\ gear=230\\ cost=14050000\\ weight=41\\ runningcost=160\\ copyright=Gauthier\\ intro_year=2011\\ intro_month=1\\ engine_type=electric\\ freight=Passagiere\\ Constraint[Prev][0]=Alstom_AGV_rear\\ Constraint[Prev][1]=none\\ Constraint[Next][0]=Alstom_AGV_frontcar\\ EmptyImage[S]=AGV.0.2\\ EmptyImage[E]=AGV.0.0\\ EmptyImage[SE]=AGV.0.1\\ EmptyImage[NE]=AGV.0.3\\ EmptyImage[N]=AGV.0.4\\ EmptyImage[W]=AGV.0.6\\ EmptyImage[NW]=AGV.0.5\\ EmptyImage[SW]=AGV.0.7</WRAP> | + | |
| - | + | ||
| - | + | ||
| - | <WRAP tip>To make the front of a trainset appear in the passengers'trains tab, write "freight=passagiere". | + | |
| - | + | ||
| - | As well, to make the cars of an electric multiple unit appear in the electric tab, write "engine_type=electric".</WRAP> | + | |
| + | As well, to make a electric multiple unit's carriage appear in the electric tab, add engine_type=electric in its dat.</WRAP> | ||
| - | <WRAP box>[[http://www.simutrans-france.fr.nf/doku.php?id=en:tutomakeobj3#objects|Come back to objects]] </WRAP> | + | <WRAP box>[[en:tutomakeobj3#objects|Come back to objects]] </WRAP> |