


Cette page vous donne les différences entre la révision choisie et la version actuelle de la page.
|
en:tutomakeobj [2010/07/09 11:04] gauthier créée |
en:tutomakeobj [2015/02/18 04:23] (version actuelle) |
||
|---|---|---|---|
| Ligne 1: | Ligne 1: | ||
| ====== Makeobj ====== | ====== Makeobj ====== | ||
| - | |||
| Makeobj is a software used to compile .dat files and .png pictures. It's very easy to use it. | Makeobj is a software used to compile .dat files and .png pictures. It's very easy to use it. | ||
| - | |||
| ===== 1.Presentation ===== | ===== 1.Presentation ===== | ||
| - | |||
| If you launch makeobj directly, nothing happens. Makeobj is a console program, if you want to see somthing you have to launch it from the command line of your OS ... we aren't going to do so. To use it correctly, it has to be launched by the command line with a command written with so makeobj would operate with the right command. There are two ways to do that : the most comfortable is using a graphical software to use makeobj like pakhelper, the fastest is using command files. The both are explained here. | If you launch makeobj directly, nothing happens. Makeobj is a console program, if you want to see somthing you have to launch it from the command line of your OS ... we aren't going to do so. To use it correctly, it has to be launched by the command line with a command written with so makeobj would operate with the right command. There are two ways to do that : the most comfortable is using a graphical software to use makeobj like pakhelper, the fastest is using command files. The both are explained here. | ||
| - | |||
| Makeobj creates one .pak file per object but it's possible to merge multiple .pak files in only one. | Makeobj creates one .pak file per object but it's possible to merge multiple .pak files in only one. | ||
| - | |||
| ===== 2.Pakhelper ===== | ===== 2.Pakhelper ===== | ||
| - | |||
| <WRAP download>[[http://minami-fukuoka.simutrans.net/english/pakhelper/PakHelper_3.2.zip|Download Pakhelper]] </WRAP> | <WRAP download>[[http://minami-fukuoka.simutrans.net/english/pakhelper/PakHelper_3.2.zip|Download Pakhelper]] </WRAP> | ||
| - | |||
| Once downloaded, unpack it, so you have a "pakhelper" folder. Pakhelper is only a graphical interface, it needs makeobj to be used, it's in this folder. Replace it by the latest version of makeobj you have. Then lauch pakhelper : | Once downloaded, unpack it, so you have a "pakhelper" folder. Pakhelper is only a graphical interface, it needs makeobj to be used, it's in this folder. Replace it by the latest version of makeobj you have. Then lauch pakhelper : | ||
| - | + | {{ fr:tuto:makeobj:makeobj01.png }}Ajust the .pak size according to what pakset you create objects for (pak64, pak128, or another pakset so you have to define the size), then select the .dat file with the icon "open" and define the name of the final .pak file which contains all .pak created from a .dat file. | |
| - | {{ :fr:makeobj01.png }}Ajust the .pak size according to what pakset you create objects for (pak64, pak128, or another pakset so you have to define the size), then select the .dat file with the icon "open" and define the name of the final .pak file which contains all .pak created from a .dat file. | + | |
| <WRAP important>The problem with pakhelper is that it can compile only one .dat file at a time.</WRAP> | <WRAP important>The problem with pakhelper is that it can compile only one .dat file at a time.</WRAP> | ||
| - | |||
| You'll find in the tab "Extrect" a tool to extract single .pak files from a merged .pak file, the tab "Merge" is to merge multiple .pak files in one. | You'll find in the tab "Extrect" a tool to extract single .pak files from a merged .pak file, the tab "Merge" is to merge multiple .pak files in one. | ||
| - | |||
| ===== 3.The command files ===== | ===== 3.The command files ===== | ||
| - | |||
| A faster way to compile .dat files is using command files which launch makeobj directly. | A faster way to compile .dat files is using command files which launch makeobj directly. | ||
| - | |||
| Makeobj is launched by the command line with a key word to tell makeobj what command it must use. The command files we are going to create do the same, you'll just have to launch a command file to use makeobj with the right command. | Makeobj is launched by the command line with a key word to tell makeobj what command it must use. The command files we are going to create do the same, you'll just have to launch a command file to use makeobj with the right command. | ||
| - | |||
| This is a list of interesting commands of makeobj | This is a list of interesting commands of makeobj | ||
| - | |||
| Makeobj PAK128 : creates .pak files for pak128 (you can do the same with pak64 or another one) from .dat files. | Makeobj PAK128 : creates .pak files for pak128 (you can do the same with pak64 or another one) from .dat files. | ||
| - | |||
| Makeobj MERGE : merge .pak files in only one. | Makeobj MERGE : merge .pak files in only one. | ||
| - | |||
| Makeobj EXTRACT : extract single .pak files from a merged multiple one. | Makeobj EXTRACT : extract single .pak files from a merged multiple one. | ||
| - | |||
| ==== Windows ==== | ==== Windows ==== | ||
| - | |||
| Put makeobj where you want in your computer. Then use notepad, write the following files and save with the extension ".bat" (format of command files). Copy the path to makeobj, for example : | Put makeobj where you want in your computer. Then use notepad, write the following files and save with the extension ".bat" (format of command files). Copy the path to makeobj, for example : | ||
| - | |||
| <WRAP box>C:%%\%%Users%%\%%Gauthier%%\%%Documents%%\%%Simutrans%%\%%makeobj%%\%%makeobj</WRAP> | <WRAP box>C:%%\%%Users%%\%%Gauthier%%\%%Documents%%\%%Simutrans%%\%%makeobj%%\%%makeobj</WRAP> | ||
| - | |||
| This path must point the makeobj.exe, not the folder where it is. | This path must point the makeobj.exe, not the folder where it is. | ||
| - | |||
| Instead of writing the path, you can just write "makeobj" but you'll have to put a makeobj.exe in the folder where command files are. | Instead of writing the path, you can just write "makeobj" but you'll have to put a makeobj.exe in the folder where command files are. | ||
| - | |||
| These are the files to create (replace "makeobj" by its path). | These are the files to create (replace "makeobj" by its path). | ||
| - | |||
| create.bat<WRAP box>makeobj pak128 2>err.txt</WRAP> | create.bat<WRAP box>makeobj pak128 2>err.txt</WRAP> | ||
| - | |||
| merge.bat<WRAP box>makeobj MERGE name.pak %%*%%.pak</WRAP>(remplacez “name” par le nom que vous désirez pour le .pak final) | merge.bat<WRAP box>makeobj MERGE name.pak %%*%%.pak</WRAP>(remplacez “name” par le nom que vous désirez pour le .pak final) | ||
| - | |||
| extract.bat<WRAP box>makeobj EXTRACT</WRAP> | extract.bat<WRAP box>makeobj EXTRACT</WRAP> | ||
| - | |||
| If you defined the path, you'll just have to copy your command files, plus it will be easy to update makeobj since you will just have to replace one file. Using each of these files is only for files which are in the same folder. So you can easily organize your work by creating a folder for each project for example. For create, the possibles errors are writtent the file err.txt created when you compile .dat files. | If you defined the path, you'll just have to copy your command files, plus it will be easy to update makeobj since you will just have to replace one file. Using each of these files is only for files which are in the same folder. So you can easily organize your work by creating a folder for each project for example. For create, the possibles errors are writtent the file err.txt created when you compile .dat files. | ||
| - | |||
| ==== Linux ==== | ==== Linux ==== | ||
| + | With linux, shell files are used, they look like windows'command files. Shell files use the extension ".sh". | ||
| - | <WRAP warning>Waiting for this part</WRAP> | + | Put makeobj in the folder you want and open a console in this folder. Write the command "pwd" which gives you the complete access path of the folder where makeobj is. For example on my computer : |
| + | <WRAP box>/home/fefe/simutrans_travail</WRAP> | ||
| - | ===== 4.Possible graphical errors ===== | + | So majeobj is there : |
| + | <WRAP box>/home/fefe/simutrans_travail/makeobj</WRAP> | ||
| - | ==== Objects look like Christmas trees in night mode ==== | + | Then open a text editor and write this line : |
| + | <WRAP box>#!/bin/sh</WRAP> | ||
| - | Your source picture contains a lot of special colors where they're not supposed to be. You can remove them with the tool "replace colors" of photofiltre for example. | + | This line defines where is the shell compiler. All your shell files must start by this line. |
| + | Here are the files to create (replace "makeobj" with its access path and don't forget the little line above). | ||
| - | ==== White stripes ==== | + | create.sh<WRAP box>makeobj pak128 2>err.txt</WRAP> |
| + | merge.sh<WRAP box>makeobj MERGE name.pak %%*%%.pak</WRAP>(replace "name" by the name you want for the final .pak) | ||
| - | {{ :fr:makeobj02.png }}Your source picture is saved as 32 buts .png, it may happen if you use windows 7 for example. Save your picture with another software like photofiltre. | + | extract.sh<WRAP box>makeobj EXTRACT</WRAP> |
| + | Here is the biggest difference with windows : Linux doesn't allow the use of softwares or scripts automatically. To use your file you'll have to modify the use's rights of your files. Open a console and us the chmod command : | ||
| - | ===== 5.Other errors witheout error message in err.txt ===== | + | <WRAP box>chmod u+x //name_of_the_file.sh// </WRAP> |
| + | |||
| + | Then, to lauch the file in a console : | ||
| + | |||
| + | <WRAP box>./name_of_the_file.sh</WRAP> | ||
| + | |||
| + | <WRAP important>If you know well linux system, you can make the makeobj's call simpler by using a symbolic link.</WRAP> | ||
| + | |||
| + | <WRAP important>If you use debian, ubuntu or their derived releases, there is the depots a package to install makeobj properly on your system. So the process is the same but you just have to write makeobj in the file instead of the complete access path.</WRAP> | ||
| + | |||
| + | ===== 4.Possible graphical errors ===== | ||
| + | |||
| + | ==== Objects look like Christmas trees in night mode ==== | ||
| + | Your source picture contains a lot of special colors where they're not supposed to be. You can remove them with the tool "replace colors" of photofiltre for example. | ||
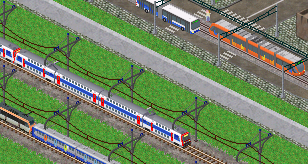
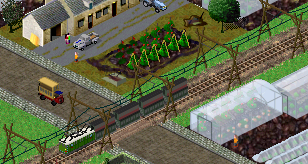
| - | ==== The object doesn't appear in the game ==== | + | ==== White stripes ==== |
| + | {{ fr:tuto:makeobj:makeobj02.png }}Your source picture is saved as 32 buts .png, it may happen if you use windows 7 for example. Save your picture with another software like photofiltre. | ||
| - | There are two possibles causes : your object may have the same name as another one, so it's replaced by this other one, or the problem is in your picture : it may be of wrong dimensions : they aren't multiples of the pakset you create for (1025 instead of 1024 pixels for example) or some pictures are missing (the icon of a building for example). | + | ===== 5.Other errors witheout error message in err.txt ===== |
| + | ==== The object doesn't appear in the game ==== | ||
| + | |||
| + | There are two possibles causes : your object may have the same name as another one, so it's replaced by this other one, or the problem is in your picture : it may be of wrong dimensions : they aren't multiples of the pakset you create for (1025 instead of 1024 pixels for example) or some pictures are missing (the icon of a building for example). | ||
| ===== 6.Error messages in err.txt ===== | ===== 6.Error messages in err.txt ===== | ||
| - | |||
| These are some error messages you can find in err.txt, some of them may have induced a makeobj crash ... don't worry. | These are some error messages you can find in err.txt, some of them may have induced a makeobj crash ... don't worry. | ||
| - | |||
| <WRAP box>Error:: No such file or directory\\ ERROR IN CLASS image_writer_t: cannot open ./image.png\\ </WRAP> | <WRAP box>Error:: No such file or directory\\ ERROR IN CLASS image_writer_t: cannot open ./image.png\\ </WRAP> | ||
| - | |||
| The file "image.png" isn't found, check that it's in the folder, check there is no mistake in the name. | The file "image.png" isn't found, check that it's in the folder, check there is no mistake in the name. | ||
| - | |||
| <WRAP box>FATAL ERROR: get_waytype()\\ invalid waytype ””</WRAP> | <WRAP box>FATAL ERROR: get_waytype()\\ invalid waytype ””</WRAP> | ||
| - | |||
| A essential parameter is missing in the .dat file, here the parameter "waytype" is missing. | A essential parameter is missing in the .dat file, here the parameter "waytype" is missing. | ||
| - | |||
| Here are the most frequent problems, if datas are missing in your vehicles, ALWAYS check the spelling of your parameters (for example "lenght" instead of "length"), some parameters are wrongly spelled but they have to be written as they are given in the previous tutorial. If you have vehicles which won't attach themselves correctly, check that names are correctly spelled in the constraints, you can copy and paster the names in the constraints to be sure, for graphical glitches, the error is always in your picture or in the offset you use. If your pictures aren't at the good place, take a screenshot and measure the number of pixels between the good place, move the picture on the source picture. | Here are the most frequent problems, if datas are missing in your vehicles, ALWAYS check the spelling of your parameters (for example "lenght" instead of "length"), some parameters are wrongly spelled but they have to be written as they are given in the previous tutorial. If you have vehicles which won't attach themselves correctly, check that names are correctly spelled in the constraints, you can copy and paster the names in the constraints to be sure, for graphical glitches, the error is always in your picture or in the offset you use. If your pictures aren't at the good place, take a screenshot and measure the number of pixels between the good place, move the picture on the source picture. | ||
| - | |||
| In case of intractable problems, ask [[http://forum.simutrans.com/index.php?board=7.0|here]]. | In case of intractable problems, ask [[http://forum.simutrans.com/index.php?board=7.0|here]]. | ||