


Cette page vous donne les différences entre la révision choisie et la version actuelle de la page.
|
en:tunnel [2010/03/31 14:50] gauthier |
en:tunnel [2015/02/18 02:06] (version actuelle) |
||
|---|---|---|---|
| Ligne 1: | Ligne 1: | ||
| - | ====== Build an underground network ====== | + | ====== Tunnels and underground networks ====== |
| - | ===== 1) What for ? ===== | + | Tunnels are useful to pass hills or mountains and also to build underground networks or undersea tunnels. |
| - | {{:fr:tunnel01.jpg}} | + | ===== I.Simple tunnel ===== |
| - | An underground network is usefull to enlarge creation possibilities.\\ They can be a bit complicated tunnels or very complew underground networks such as a metro network.\\ Plus, metro is a solution to transport a lot of passengers through a city without modifying it.\\ Undersea tunnels can also be made, they are useful on not too long distances.\\ | + | Select the tunnel tool and click on one of the extremity of the future tunnel, is the both facing extremities allow the construction of a tunnel entry, the tunnel is built :{{ :fr:tunnel01.jpg }} |
| - | ===== 2) The underground views. ===== | + | ===== II.Complex constructions ===== |
| - | \\ \\ In the latest releases of Simutrans, there are two kinds of underground view. The first one show everything under the ground, it can be used by the shortcut "U".\\ There is another useful view : the sliced view. It allows to see underground structures on only one level. It's convenient for underground construction. To use it, go in display options.\\ | + | ==== 1.Choose the adapted view ==== |
| - | {{:fr:tunnel02en.png|}} | ||
| - | ===== 3) Entamer un tunnel. ===== | + | As seen in the tutorial [[http://www.simutrans-france.fr.nf/doku.php?id=en:interface|Settings and interface]] there are two ways to see under the ground. To have a global looking at the underground networks, it's better to use the normal underground view <wrap tip>keyboard shortcut "shift+u"</wrap>, to build easily an underground network in one or more layers you'd better use the layer sliced view :{{ :fr:tunnel02.jpg }} |
| - | \\ \\ Lorsque vous construisez un tunnel normalement, une voie souterraine part d'une entrée du tunnel et va en ligne droite vers la sortie de l'autre côté.\\ {{:fr:tunnel03.png|}}\\ Pour faire un réseau il sera plus pratique de n'avoir qu'une entrée de tunnel. Pour construire une entrée de tunnel, utilisez l'outil tunnel normalement en gardant la touche ctrl enfoncée.\\ {{:fr:tunnel04.png|}}\\ | + | <WRAP important>Build under the ground with the global undergroun view is possible but not very practical.</WRAP> |
| - | ===== 4) Construire en souterrain. ===== | + | ==== 2.Build a complex underground network ==== |
| - | \\ \\ Pour construire des voies souterraines ensuite, on n'utilisera pas l'outil voie comme en surface mais l'outil tunnel, le même qui aura servi à construire l'entrée du tunnel.\\ {{:fr:tunnel05.jpg|}}\\ Les voies sous terre se comportent de la même façon qu'en surface. Vous pouvez y construire des signaux, des gares, des dépots, les électrifier ... Vous pouvez également construire des rails de tram dans des tunnels routiers.\\ {{:fr:tunnel06.jpg|}}\\ | + | It's possible to build just a tunnel entry instead of a complete tunnel by holding down ctrl key while building :{{ :fr:tunnel03.jpg }}Then the underground constructions are the same as ground's ones but instead of using a way tool you have to use the tunnel tool which works the same way :{{ :fr:tunnel04.jpg }} |
| - | ===== 5) Pentes souterraines. ===== | + | Then you can build stations, signals and electrifications as you want. |
| - | \\ \\ La gestion des pentes est un peu délicate, de plus si vous construisez un réseau avec des pentes, il est conseillé d'utiliser la vue en tranches.\\ Si on veut construire une pente vers le bas au bout d'un rail, on utilise l'outil de modification du terrain.\\ C'est pareil vers le haut, mais compte tenu des caractéristiques de la vue en tranches, il est préférables de construire de haut en bas.\\ {{:fr:tunnel07.png|}}\\ | + | ==== 3.Underground slopes ==== |
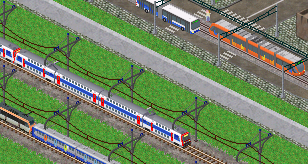
| - | ===== 6) Tunnel sous-marin. ===== | + | To make an underground slope, use first the adapted artificial slope tool on a way extremity to make a down or up slope.{{ :fr:tunnel05.jpg }}Then vary the height of the layer sliced view to go to the lower or higher layer and extend the network.{{ :fr:tunnel06.jpg }} |
| - | \\ \\ En fait si vous cherchez un peu vous verrez qu'il est possible d'aller en dessous du niveau de la mer avec vos tunnels. C'est précisemment de cette manière que l'on construit des tunnels sous-marins.\\ {{:fr:tunnel08.jpg|}}\\ En revanche faites attention à la profondeur de l'eau, vous ne pourrez pas construire un tunnel au niveau -1 sous une mer qui a une profondeut allant jusqu'à -3.\\ D'autre part l'utilisation de la vue en tranches est obligatoires pour voir sous l'eau.\\ \\ \\ Maintenant que vous savez tout sur les tunnels, à vous les métros les plus tordus ;)\\ {{:fr:tunnel09.jpg|}} | + | ==== 4.Undersea tunnels ==== |
| + | |||
| + | |||
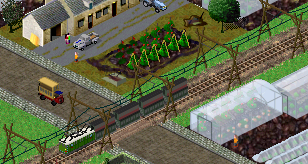
| + | You can build undersea tunnels by the same way but of course you have to take care of the sea deepness : more the sea is deep and more the tunnel must be deep.{{ :fr:tunnel07.jpg }} | ||
| + | |||
| + | |||
| + | <WRAP box>Next tutorial : [[http://www.simutrans-france.fr.nf/doku.php?id=fr:elevatedway|Elevated ways]] </WRAP> | ||